Monday, June 6, 2011

First winter harvest and a jicama

Keeping up with winter colours, our veggie garden has given us white colour vegetable to harvest such as daikon and snowball turnip. Other regular harvest are snow peas and yellow cherry tomatoes. We also harvested our last angled luffah for this year.
Harvested some sweet corn and chili last week.
Ilhan had some buttered sweet corn for breakfast.
Clearing up old plants in container which is not productively producing last weekend. We were surprised to harvest some sweet potato tuber that were invading carrot container. Due to that, carrots were so much smaller than sweet potato tubers.
Da Cheong Chae look so terrible from pest attack that I pull out all of them. Bitter gourd still produce female flower but the fruit won't grow that big so I harvested them last weekend. Clearing up the containers with unproductive old plant for new planting given us some leeks and spring onions. We don't usually allocate space for spring onion usually inter-planted them with other plants.
End last spring, we sowed jicama (sengkuang/yam bean) seeds for the first time in our veggie garden. The sad thing that direct-sowed seedlings on our patch that received full sun all day died on the first heat wave of 40+degree Celcius.  Jicama plants that survived are growing in containers which received only morning sun. As we had already enter winter, jicama plants does not look good. So I am a bit worried at the moment whether we actually have some tuber to harvest or not. Moreover, I worry if too much rain will make the tuber rot if we don't harvest them quickly. So last weekend, gently I moved the soil away from one jicama plant to see whether we get any tuber or not. Surprisingly, the root went very deep, I had to dig about 20cm deep to finally see some white root. Our first home-grown jicama and look like a top.

See other gardeners around the world harvest this week at Daphne's Dandelion Harvest Monday.

Sunday, June 5, 2011

Local Edible Produce Swap and Lemon Poppy Seed Cake

Our local community organise fruit and vegetable swap on the first Saturday of the month during winter and spring season. You don't have to live in our community to join in. If you want to know when the next swap will be held, the organiser will send you an email or I can email you the address. Yesterday, we participated and brought some of our excess fruit, herb and vegetable seedlings. The only fresh produce that we managed to pick early in the morning to share was yellow cherry tomatoes, chilies, snow peas and lemon grass.
We came back with a nice basket full of produce ~ Pumpkin, lemons, eggplant, persimmon and quince jelly. Our fisherman brought back 3 salmon trouts. Since winter season has begun, it is salmon trout and bream season. There will be many salmon trout to fish in St. Kilda and Mr. Fisherman will have frequent trip there  early Saturday morning during winter. So with fresh fish and eggplant, we made ikan masak assam pedas for lunch. I have not bake a cake since I gave birth to our first child Ilhan, and when I visited A Nyonya's Kitchen ...for all season blog, the lemon poppy seed cake look so delicious I decided to have a go making it. Thanks to Catmint, we have some poppy seeds and lemons from the local swap to bake this cake.
Lemon Poppy Seed Cake  (recipe from A Nyonya's Kitchen...for all season, terima kasih)
Ingredients:

10g poppy seeds (actual was 40gram)
125ml milk
250g butter, softened
1 tbsp finely grated lemon rind
275g caster sugar
4 eggs
335g self-raising flour
110g plain flour
240g sour cream
Method:
1. Combine poppy seeds and milk, soak for 10 minutes.
2. Beat butter, rind and sugar with electric mixer till light and fluffy.
3. Add eggs, one at a time, beating until combined.
4. Stir in sifted flours, cream and poppy seeds into mixture, in two batches.
5. Spread mixture into pan, bake for about 1 hour at 160 deg C.

Lenay was excited making this cake, she was really worried that the cake will be over-baked and keep a close eye on it while the cake is in the oven. Where was the cook while the cake is in the oven? She was already near the veggie patch, absorb on planting shallots and other vegetables. Lenay had to call the cook many times to take a look on the cake. We were supposed to wait for an hour but Lenay poke it with toothpick about 45 minutes and it came out clear. So when the cook returned to the kitchen one hour later, she was surprised the cake was out from the oven. Leaving it baking one hour should be fine as when we cut the cake there are still some moist spot. The cake was very delicious. We will enjoy making this cake again in the future. Since we only have one baking pan, the extra batch we use the muffin baking pan. I hope Mr. Fisherman will let me buy some baking pan. 

Saturday, June 4, 2011

Behind the backyard fence

Most of our June harvest will be from this veggie patch which is outside from our house compound. As it is not been look after that much, the plants must have been very happy with the occasional rain that we are having lately. As I was looking back at my previous post about how the plants were progressing last month, I was quite surprise how much they have grown. Ilhan sweet corn patch has many cobs now and his mammoth sunflower is about 8 feet tall with no sign of bud yet. If the mammoth sunflower bloom we can see it from inside the house.
Sunflowers that have just recently bloom.
Mammoth snow peas at the back and telephone peas in front which are producing pods. We used sunflower stalks to make this trellis for the peas to climb. In between these peas are daikons growing which we had  harvested quite a lot since last month. Hopefully this patch will provide enough vegetables for our kitchen this month. Caterpillars are having a fun time with daikon leaves. Our record so far is finding 12 caterpillars on one daikon plants. I don't mind about caterpillars munching on daikon tops as long as it keep away from the greens.
Potatoes plants were so small and newly sprouted last month. I was surprised that one potato plants have already flower early this month. I inter-planted giant purple mustard with potatoes. Mustard secretes some substance that nematode dislike, function same as marigold. Near the fence, I sowed some bush peas which is about 20cm tall now. These peas are starting to give some pods now although it is so tiny. On my bad planning, I wonder how I am going to balance myself to pick them and avoid stomping on other plants. This is the first time, we are growing bush peas, in the seed packet it is said that it can grow a metre tall. But I did not think that it start to produce when it is less than 20cm tall. At the front, 4 rainbow chards plant. First time growing rainbow chard and I wonder does the leaves suppose to look wrinkle like that.
This patch is growing vegetables that I am trying for the first time. In this patch are Florence fennel, Purple vienna kohlrabi, heirloom mix beetroot, purple dragon carrot and parsnip. We never eaten kohlrabi and beetroot, so it will be fun to have our first taste with our home-grown later if we grow them successfully. Purple dragon and parsnip don't look very good on this patch but we have them growing on other patch.
Self-sowed tomato plants surprisingly bear some fruits now. Bush beans are not prolific anymore, I should plant other vegetables when I find the time.
Hope you have a nice weekend.

Thursday, June 2, 2011

Sweet potato donuts

Sweet potato is an easy plant to grow if you have its favourite type of soil and weather. It can be very invasive. It is best to grow one shoot or slip in one metre square between each plant. Some Asian groceries sell sweet potato shoots for cooking. On this sweet potato vein shoots have nodes where the roots will grow on soil or water. I found sweet potato shoots last October in Gepps Cross Sunday Market. I was not sure what variety sweet potato shoot it was, but it was a fun experiment.

Sweet potato shoots

The roots sprouted very quickly in 2~3 days in warm water end of Spring. Just leave it near a sunny window.DSC09611
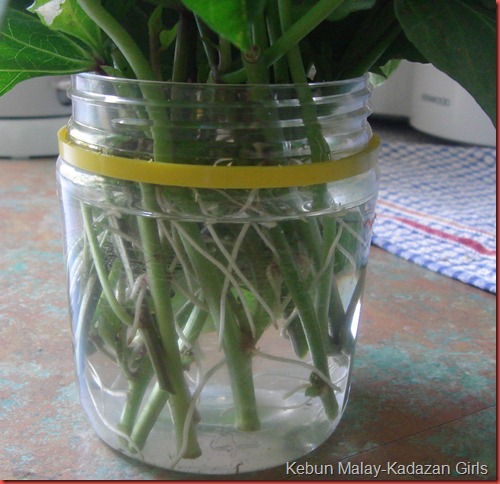
Plant the shoots with the roots tuck nicely into the warm soil. It grows very quickly in mild weather. As usual my plants like to have a break in middle of summer for weeks if planted on our most sunny and hottest place in the garden doing nothing. Then it picks up growth again end of summer. I should mention sweet potatoes is heat-tolerant, although it does nothing if the soil is too hot.

DSC00066

Last summer, I experimented growing sweet potatoes in 3 different location in our garden to see which is the best growing method for our garden.

Sweet potatoes growing in polystyrene container~ Received only morning sun, no checked growth, very fast growth and good harvest in just about 4 months.

Sweet potatoes growing in heavy clay soil~ I wish that sweet potato can help break the soil like potato. Unfortunately, I did not get my wish. Partial shade, no check growth and many leaves. However, a very small tuber were obtained from each plant after 22 weeks from planting.

Finally, we harvested our sweet potatoes that were growing in our most sunny part of the garden in summer last Saturday. It is starting to rain a lot last week so I was afraid if I leave it longer it will be rotten. Moreover, I was getting anxious about my garlic which I have not complete planting yet because of this space. I don’t think if I let them grow longer it will give me more since the soil will be colder now. Since it was growing in the hottest part of the garden during the summer, it has stop growing during middle of summer and pick up growth after the weather has become mild again. Growing on a good loose soil.

DSC00034

What a relief to dig in and find some sweet potato tubers.

DSC00035

I think for our garden, planting sweet potatoes in container is the best method to get quick harvest and make the garden much more productive. Next spring, we are on a quest of vegetables that can grow well at our hottest part of the veggie patch again.

DSC00056

With this harvest, we made sweet potato donut or famously known as kuih keria in Malaysia. English have their tea with cakes, Malaysian have kuih keria for tea Winking smile. It is very easy to make and you don’t need much ingredients for it.

Ingredients: Sweet potatoes, plain flour, cooking oil, water and sugar.

Boil or steam sweet potatoes until soft. Take them out from the boiling water and mashed. Add in plain flour bit by bit and mix it well. You don’t need flour anymore if it is not that sticky and you can roll it make a doughnut shape. Be careful though that too much flour will give you a hard donut. Fry the donut in hot cooking oil.

For the sugar coating, I usually snip some pandan leaves and extract some juice from it which I will use for the coating later. In a clean pot, add in sugar (for example 2/3 cups of water) and the pandan extracted juice (4~5table spoon). The pandan juice is just to dissolve the sugar. Usually, only plain water is used but I like pandan flavour and aroma. Stir on moderate heat and just before it starts to crystalize (which usually is a quick process), quickly add in the fried donuts to coat.

Join in Wendy’s Garden To Table Challenge.

DSC00071

Every cook has their special tips or advice or different ingredient. I am basic cook. If you are a first timer and not sure about the measurement, check out this great blog:

CikManggis~ Jom masak, jom makan-makan…

Shaz~ Test With Skewar

Sonia~ Nasi Lemak Lover

Wednesday, June 1, 2011

Japanese Radish Cake

I was worried at first with so many daikon seedlings that Lenay sowed while we were away for Rayyan surgery almost 3 months ago sprouted. Germination was 100%. I don't think we can possibly harvest them all. I was only planning a row of daikon but Lenay made 3 rows. She and Ilhan must be very bored while we were away. Now I have stop complaining because it has help fill in the gap until other winter vegetables are starting ready to be harvested end of winter or early spring. What is wonderful about daikon compare with other radish variety is that it does not need to be harvest quick because it does not become woody quickly. Moreover, it grow so big very fast. If you have a pet and worried about them trampling on daikon seedlings, don't worry, they are almost stomp-proof. We grow daikon at the back of our fence on a reserve land and one day a driver who wanted to test his car during dusk drove through those young daikon seedlings which just sprouted true leaf. Those seedling look pretty bad and I thought they won't survived as some were totally squash out. I don't say those word out aloud because Lenay is having tears in her eyes since it is her project patch. She planted and hill up the ones that were uprooted. Surprisingly they did grow pretty good (photo as evidence).
I have only started growing plants on this area last August so the soil is still very hard. Since I can see white roots on top of the soil, I reckon those daikon is already having a very hard time to push into the soil for bigger and longer root growth. I pull several out last weekend and it was not an easy thing to do. We have to be careful or the roots breaks in the soil and you have to dig out the rest part of the root which is not easy since the soil is very hard. Avoid pulling the top but hold on to the roots and try to turn them right and left gently to pull them up. Some of the daikon has reach their limit to try breaking the soil to grow some roots and start to become forky. Daikon can grow at least 40~50cm long and like potato, it is a good soil-breaker. Because of that, I have already planned to grow garlic on this row of daikon after I finished harvesting this long white root.
Fresh home-grown vegetables are the best thing but eating daikon many times a week will probably make you wish for other stuff as well. So last weekend project was about searching and trying new recipe with radish other than soup or stir-fry daikon with anchovies which what has been prepared in our kitchen since the daikon harvest started in our garden. If you have a glutton of radish and run out of ideas to prepare it, here is a recipe that I tried from Terry Tan's The Thai Table cooking book ~ Steamed Radish Cake (Khanom Chai Tau). I am not a very good student for following step-by-step instruction in cooking but it is not difficult to prepare.
Steamed Radish Cake (Khanom Chai Tau)
Makes one 200gram cake
Ingredients:
Daikon 900gram , peeled and grated
Rice flour 400gram
Tapioca flour or Corn flour (cornstarch) 55 gram
Water 125ml
Salt 2tsp
Cooking oil 2Tbsp
Vegetable Stock cube 1, crushed

Place grated radish in a blender and blend until fine. Set aside.
Combine both types of flour and sift into a mixing bowl. Gradually add water and mix well. Mixture should be thick and moist. Add salt, oil, stock cube and radish. Mix until well blended.
Transfer mixture to a non-stock, medium-sized pot. Cook over low heat for 10 minutes, or until cake is firm. Remove from pot and steam over high heat for 30 minutes. Radish cake is ready when an inserted toothpick comes out clean. Set aside to cool before use.
A very healthy vegetarian cake.
Note: Some people needs to get used of the strong daikon flavour before having this. When I asked my husband what does it taste like? Taste like you are eating daikon...hmmm...I would probably used 2 vegetable stock cube next time. This is our first taste of Steamed Japanese Radish cake and I think it goes well eating it together with sambal ikan bilis (chili anchovies). Looks like kuih bingka when its cooked.
White Wednesday at Faded Charm.
It is the first day of winter here and it is such a fine sunny day today, although cold if you go outside.
Hazel is celebrating our first winter day this year with Winter Wednesday.